Thursday, January 2, 2014

Happy new year and new site is under construction!

Happy new year folks! I have been working on some website building stuff. Yes, I'm building a new website for my handmade lures! 
The reason is that Chinese government blocked all the social website that they cannot control, including Facebook, blogger, YouTube, etc. Pretty much every site I like.
I have to pay for some VPN service to go around the wall. 
Posting pictures is one of the most inconvenient things under this situation. 
So, I decide to purchase  a domain name and a hosting service to build my own site!
The new site is under construction right now and the domain name will be post here when it's ready.
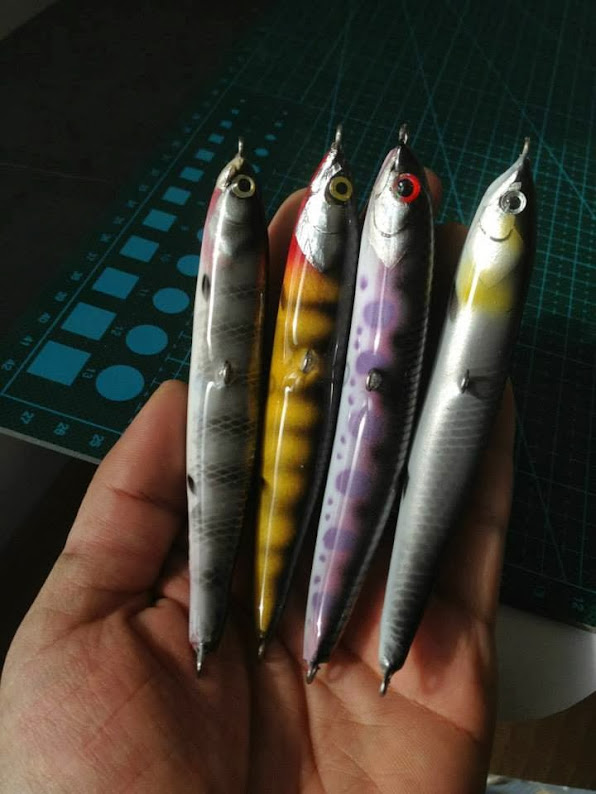
Here is a new design of the crazy minnow, with a more realistic body shape and gill plates. 
You all have a great year of 2014!
 Inline image 1

Saturday, December 7, 2013

The beauty of nature

It's been a while. I think I'm just too lazy to upload photos. :-)
Some of you guys already saw the pictures on FB. Anyway, here are some pics I took while making those peal shell crazy minnows.
Blanks were cut using table saw, I love this power tool!
Inline image 1
And then come to the shaping step. The more precisely you carved, the less dust you will get from sanding. I definitely hate sanding! 
Inline image 2
But I got to do it :-)
Inline image 3
Then sealed with epoxy, that's 12 hours wait! I have plenty work to do during waiting time, since this time is for pearl shell lures.
Inline image 4
Fun part started by doing diamond cut. The shell is so fragile, it's a good idea to put double-side tape on the back. 
And here is a great video of how to do the diamond cut from Solarfall https://www.youtube.com/watch?v=iIFRBN3wWz8

Inline image 5 
One trick I use is to cut the shell as light as possible, and break it later with a plier.
Inline image 6
Apply the shell to the lure and coat another layer epoxy ( maybe more layers, depends on how thick you applied)
Inline image 7
Carve the gill plates and give a simple black and white on back and belly. And final coat of epoxy, you are done! Enjoy!
Inline image 8Inline image 9

Friday, November 22, 2013

More baits, more painting

Since I love the crazy minnow so much, I've been enjoy making these for days. And I think I have few extra baits other than my self use. 
In order to cover some materials and supplies, I'm trying to sell some. 
Those baits are about 12gram(3/8oz), 11cm(4 1/2 in) without hooks
Foiled gill plates, multi-layers epoxy, absolutely hand made including eyes! Each bait is unique!
Each bait takes about 5 hours excluding drying time, and the price I decided is $50 USD plus shipping. 
Orders of 6 or more get free shipping world-wide!
Feel free to to contact me at kejeon@gmail.com
before:
Inline image 1
after: I know I need a better lure display other than my hand :-)
Inline image 2

Friday, November 15, 2013

Same body different look

I'm quite happy with the action of "Crazy Minnow", so I made some more balsa blanks.
While, in order to keep it fun, I carved different gill plates and painted different patterns. And I think they turned out great.
Inline image 1Inline image 2Inline image 3Inline image 4Inline image 5Inline image 6

Friday, November 1, 2013

"Crazy minnow" swim test

These are some jerkbaits I've been working on, I call them"Crazy Minnow" :-)
Some pics from my drying wheel,
Inline image 2Inline image 3
The other day when I wanted to test the swimbait, the water is so muddy. I could not film the action. And today the water is crystal-clear. I kind like the unpredictable action when jerking it.
Here are the two I was testing today.
Inline image 1Inline image 4Inline image 5

Monday, October 21, 2013

Swim test of my bluegill swimbait

Actually, this is the 2nd prototype of the swimbait project. The first one "dead".
The first one has a strong swim action if retrieve fast. It swims steadily and no rolling once it starts to swim.
After countless tests and tweaks, I finally decided the shape and weighting position. Here is a quick test in my sink. Just get an idea how this bait swims when slow retrieving.
I'm happy with the action in the sink. I'm going to shore tomorrow to test this bait and some other prototypes.   Will shoot some video for sure!

Monday, September 23, 2013

Swim bait project started

I was so boring the other day while carving the facial part of all those top water lure. 
One of the great method of solving this is to start another project :-)
I had never work on a swimbait before. And I really like the perch model of Mikko's recent work.
He made the perch, so I want something else. LOL just kidding.
Anyway, I don't know, for whatever reason, I started this bluegill swimbait project.

Here is some pics after rough sanding.
Inline image 1Inline image 2Inline image 3
Since I've never done a swimbait before, there are lots of things to try/learn, also I have to practice the scale cutting, there is no deadline for this project! LOL! I'm quite happy with the look of this bait, btw.